To help you get on your way by making your own panoramas we have selected a couple of cameras which we have tested and are capable of making a 360º panorama that meet the *requirements of EnergyPlanner.
*Recommended spherical pano-resolution: 12.000 x 6.000 or higher with JPG compression
< 20MB. Aspect ratio should always be 2:1. If you experience performance issues, decrease resolution, use higher compression or upgrade hardware.
360º camera comparison
- Ricoh Theta SC2
- Insta360 X3
In the table below you will see a brief comparison between the two cameras:
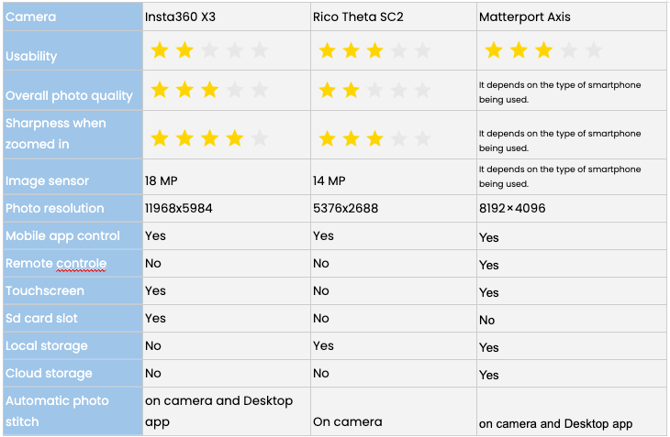
* The resolution is limited by the software of the Matterport Axis
** Local storage of the Rico Theta SC2 is 14 GB. The local storage of the Matterport Axis depends on the type of smartphone being used.
*** The new Insta360 X4 has the same photo resolution as the X3.
On this page you will find a number of examples of 360 degree photos that have been created and tested by us.
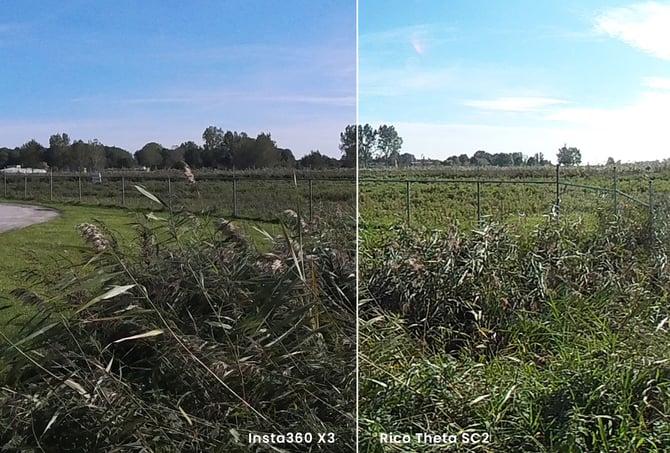
Photo quality comparison
The images below show the image quality difference between the Insta360 and Rico Theta SC2. The big difference is in the amount of detail that is visible in the distance, where the Insta360 excels.
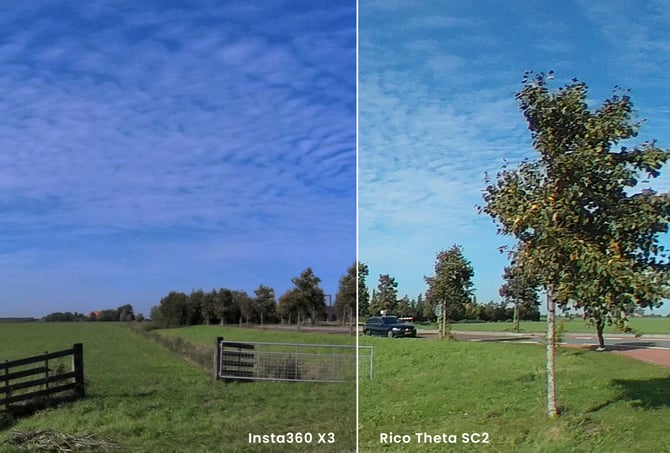
There is more detail in the contours of the objects in the environment, which is important when a potential project is some distance away. Where the detail in the Ricoh Theta quickly disappears, this is noticeable in the car and the trees behind it.
This is mainly due to the 72 megapixel camera of the Insta360, with the Rico Theta having an 18 Megapixel camera.
The Rico Theta excels with a larger color palette, making the photo more colorful and vibrant. This camera is excellent to use when a project is located close to the photo location
Ricoh Theta SC2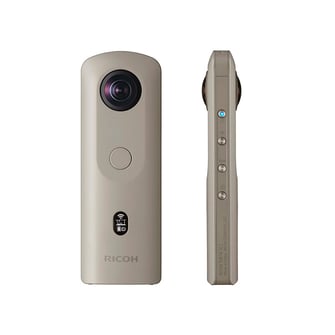
The Ricoh Theta SC2 is one of the smallest cameras to make 360º videos and photos, in this document we will only focus on how to make 360º photos. The camera takes pictures at a resolution of 5376 x 2688 pixels (14 megapixels).
The camera is ready to use straight out of the box, no further setup is needed. However, the camera can be controlled via the accompanying mobile app, which we recommend. This allows the camera to make use of your mobile phone’s GPS receiver, and to store this data inside the picture. EnergyPlanner will then use this data to place your picture correctly in the 3D world
Please note that you need to register a (free) account to use the app.
Step 1. Turn the camera on by pressing the power button on the side of the camera, a light will illuminate when the device is on.
Step 2. With the mode button you have to select the right mode for making 360º panoramas, press the button until a pictogram of a camera is visible on the screen.
Step 3. Press the big white button to start the countdown, a short sound will let you know that the photo was taken successfully.
Step 4. Connect the camera to a computer with the supplied USB cable, you can now retrieve the photos from the camera.
When you have copied the photos to your computer, you can then upload them within EnergyPlanner. Curious how this works? See our how to video for further instructions.
For the best result it's best to place the camera on a tripod, this will ensure a more stable 360º photo with a straight horizon.
 Insta360 X3
The Insta360 is a more advanced camera and will take higher detailed photos then the Ricoh Theta SC2. The camera takes pictures with a maximum resolution of 11968x5984 pixels.
A MicroSD card is required when using the camera, which is not included as standard.
Step 1. remove the battery from the device and then install the MicroSD card. Replace the battery and turn on the camera. Follow the camera's on-screen instructions to set it up correctly.
Step 2. The camera can be controlled via the accompanying mobile app, which we recommend. This allows the camera to make use of your mobile phone’s GPS receiver, and to store this data inside the picture. EnergyPlanner will then use this data to place your picture correctly in the 3D world.
After installing the app, we first have to make sure that the camera is set to the correct mode. This can be done on the camera itself by tapping the photo or video icon which is indicated at the bottom right of the screen of the device. Swipe the screen until the photo icon is at the center of the screen, make sure the 360º option is selected instead of the single lens mode. It’s also recommended to set the Megapixels to 72, this will ensure that the photos will be taken at the maximum resolution. These options are displayed at the top of the screen.
Afterwards, you are able to change these settings inside the mobile app to whichever option you prefer.
Step 3. Press the button with the round icon below the screen to take the photo. It takes a few seconds to take the picture and save it to the SD card.
Step 4. Remove the SD card from the device and insert it into the computer. You can now retrieve the photos from the camera using the Insta 360 Studio app. With this app you can select and export the desired photos.
When you have exported the photos to your computer, you can upload them within EnergyPlanner. Curious how this works? See our how to video for further instructions.
For the best result it's best to place the camera on a tripod, this will ensure a more stable 360º photo with a straight horizon.
Matterport Axis & Software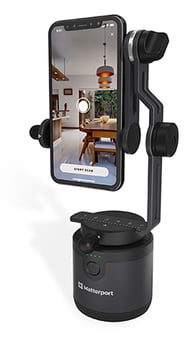
The Axis makes it easy to create stunning spherical photos by automating the rotation of smartphone capture to reduce user error. Simply slide your smartphone into the axis and control the capture process with the mobile app.
The output quality of the spherical photos greatly depends on the used smartphone and its camera, the higher the megapixels are, the better quality of the photos will be. Please note that the current Matterport software supports a maximum resolution of 8192 × 4096. If you require a higher resolution, it’s better to opt for the Insta360 X3.
The following parts are needed to get started with the Axis.
- The Axis itself
- Tripod, preferably with a height of 1.7m incl. spirit level for accurate photos.
- Matterport Account for uploading and editing the photos.
Step 1. Create a Matterport account and take out a subscription.
Step 2. Download the Matterport app on your smartphone and log in with the account you created.
Step 3. Create a project/room, which must be created at the project location.
Step 4. Now it's time to take the photos. Place the Axis on the tripod and place the smartphone in the Axis. Follow the included "Let's get started" manual to properly install the smartphone. This is included with the Axes.
Step 5. Connect with Bluetooth. In the capture app, open an existing job or start a new one. Then tap the button labeled with your device name, located above the camera button. Select Connect Axis to pair with Bluetooth
Step 6. Place the tripod and Axis in the desired location and follow the instructions in the app to take the photo. Side note: make sure that in "options" you choose "360 scan" and "Full scan". This button is located next to the camera button.
Step 7. After the photos have been taken, it is necessary that the images are uploaded to the cloud. Open the project and click the "Upload" button at the top right.
Step 8. Log in with your account on the Matterport website and navigate to "All spaces" where you will find the created project. It may take a few hours before all photos will be visible, depending on the photo quality and the number of photos taken.
Open the project and click on "Media" in the menu bar and then on "Edit" at the top right. Click on the camera icon in the menu on the right. Then click on "Pano" at the top.
When you click on the camera icon, the photo will be saved as a 360 degree sphere photo and you can view it by clicking on the "view photo" button, which is next to the camera button.
Click on the photo you want to download in the overview, click on the three dots at the top in the screen that follows and select "Download". The photo is now saved to the computer. Do this for all the spherical photos you want to use.
Step 9. When you have exported the photos to your computer, you can upload them within EnergyPlanner. Curious how this works? See our how to video for further instructions.